|
In part 2, I talked about preconditions, post actions and some other ways to add limits to tests. In this part I’ll continue looking at some of the other step types, specifically:
Creating a sub-sequenceIf you have ever read anything National Instruments puts out on good code development practices they always talk about coupling and cohesion. That is, making code modules that are loosely coupled and have high cohesion. Coupling means that code modules are for the most part independent and not too “coupled” together. Cohesion means that the all the code in one module is there to perform the one purpose of that module. One way to build cohesion into a TestStand sequence is to make the separate tests (or whatever logical division you are using) into their own sequences. You can either have a sequence file call other sequence files or you can create a subsequence that is called from a main sequence. The difference between the two is that subsequence is not visible in file directory, it’s just stored in the main sequence. Starting with the TSBasics2.seq sequence file from part 2 and renaming it TSBasics3.seq, I’ll show how to turn the Sine Amplitude and Frequency Test into a subsequence. Figure 1 shows the sequences pane, right click and select insert sequence. 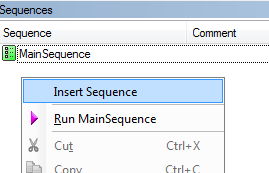 Figure 1. Inserting a sub-sequence in the Sequences pane. Name the new sequence AmplitudeAndFrequencyTest. Cut and paste the steps from the MainSequence into the new AmplitudeAndFrequencyTest sequence. At this point this new sequence is still not called, so we have to drag a sequence call step from the Insertion Palette into the MainSequence and set it to call the new AmplitudeAndFrequencyTest sequence. Rename the sequence call, as shown in Figure 2, right click and select Specify Module. Then, click on the Use Current File check box and select AmplitudeAndFrequencyTest from the drop-down list as shown in Figure 3. 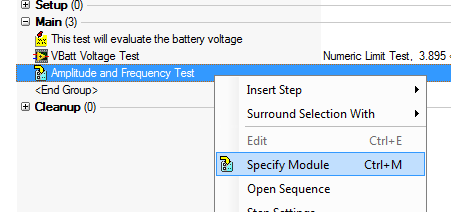 Figure 2. Specify the sequence you want to call with a Sequence Call step type. 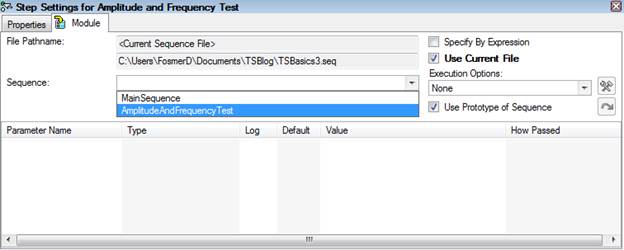 Figure 3. Select the AmplitudeAndFrequencyTest sub-sequence to call. There is one more thing to fix. Since we used local variables in the main sequence to move the amplitude and frequency measurements into the limit steps, we have to put those local variables in the new AmplitudeAndFrequencyTest subsequence. These can just be cut and pasted from the main sequence. Message popup and passing parametersNow that we have a subsequence in order to interact with this subsequence in a way that maintains good cohesion we have to add parameters to the subsequence. First, let’s use the Message Popup step type that will allow the user to set the stimulus frequency. This message popup will set the users input to the local variable called StimulusFrequency. Then we will add a parameter to the AmplitudeAndFrequencyTest subsequence called SetStimulusFrequency which will be passed to the VI for testing and we will see the result on the report. Add the message popup step type (Figure 4) 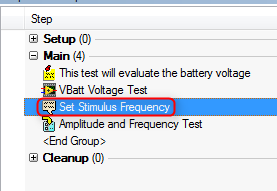 Figure 4. Adding a message popup step type. Create a local variable in the main sequence called StimulusFrequency. On the message popup, rename it to “Set Stimulus Frequency” and go to the Expressions tab of the step properties. Add the Post-Expression, Locals.StimulusFrequency=Val(Step.Result.Response) as shown in Figure 5. This will assign the user response to the local variable and the Val function will convert the string to a number. Go to the Options tab of the Message popup and click the Enable Response Text Box option. This is what allows the user to input a value. 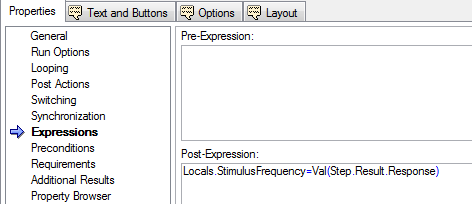 Figure 5. Adding a variable for a response text box type message popup dialog box. The next task is to go into the Amplitude and Frequency Test sub sequence and create a parameter called SetStimulusFrequency shown in Figure 6. This will be how the sub-sequence is passed the stimulus frequency from the upper level main sequence. 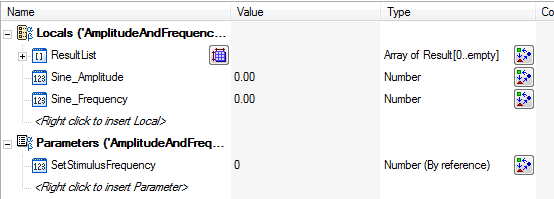 Figure 6. Adding a parameter to allow passing data from the main sequence to the sub-sequence. To add this as a parameter, from the MainSequence we click on the Amplitude and Frequency Test sub-sequence. Select the SetStimulusFrequency parameter and use the Value field to set the value that will be passed to it. Here we are using the local variable StimulusFrequency. See Figure 7. 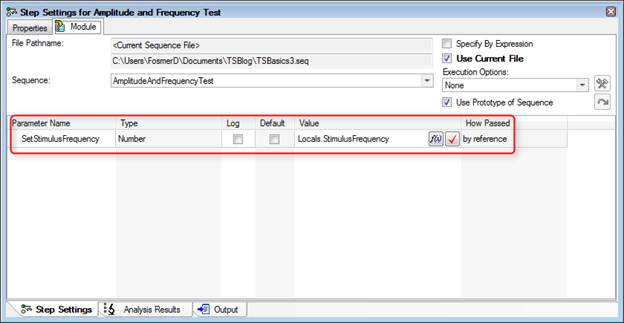 Figure 7. Setting up the local variable that will be used as the parameter to pass into the sub-sequence. Another thing we should do when adding user input is validate that input. The user input is accepting a string and we are converting it into a number, we should make sure that is a valid number. Right now the limit on frequency is 4999 to 5001, let’s open that up to 1000 to 10000. I’ll make two locals holding these values, 1000 and 10000. Then I’ll add a status expression to make sure the entered value is within this range. Figure 8 shows the expression. If the input is not in this range, then the step fails and we’ll add a post action to repeat the step on failure shown in Figure 9.  Figure 8. Expression to check if the user input is within the acceptable bounds. 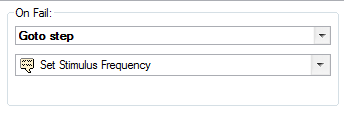 Figure 9. In the event of an invalid input the dialog will popup again to ask the user for input. We also have to go the Run Options tab in Figure 10 and uncheck the Step Failure Causes Sequence Failure option, or any incorrect entry will cause the test to fail. Now, if you enter a number smaller or larger than 1000 to 10000, it will just pop back up to reenter. This isn’t totally fool-proof, for one thing there is no dialog explaining that you entered an invalid value and you could probably enter text into the dialog that would convert to a number in this range and the sequence would pass with some random input. Another problem is the validation values are not tied to the actual limits, so there could be a mismatch. So… room for improvement. 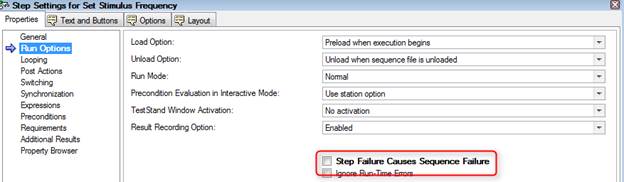 Figure 10. Uncheck the option that step failure causes sequence failure. Failure here indicates incorrect input not test failure. This last step also gave us a chance to write some expressions. Expressions are very powerful, but I’ve found they can be tricky and the help isn’t always easy to find. The expression browser shown in Figure 11 is probably the best bet and a lot of experimenting and learning has to take place. 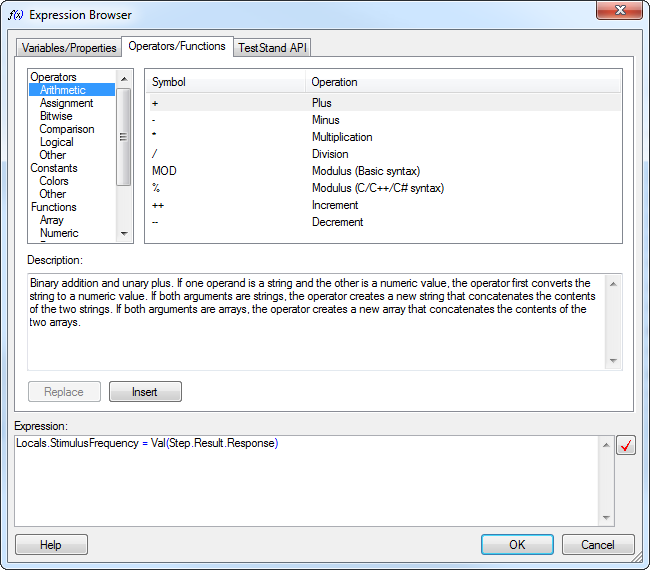 Figure 11. Expressions can be extremely complex, the Expression Browser provides help and context to writing them. Using the Property Loader The last thing I’m going to look at today is the Property Loader. The Property Loader is a step type that will load properties from a file or database. This is super-useful because you can keep things like your test limits in a separate file and change them without having to change the sequence file itself. It’s pretty easy to set this up, I’ll demonstrate with loading properties from Excel. First drag a Property Loader step type into the Setup step group of the main sequence. This is the perfect type of operation to put into the Setup step group of the as it fits well into the logical category of setup. Since we already have all are limits setup in the sequence file and sub-sequence it’s easy to create the limits Excel file. Click on Tools -> Import/Export Properties… On the Source / Destination tab select file and Excel, on the Properties tab select all sequences and click the limits button. Click Export, give it a file name and click done. See Figure 12 and 13. 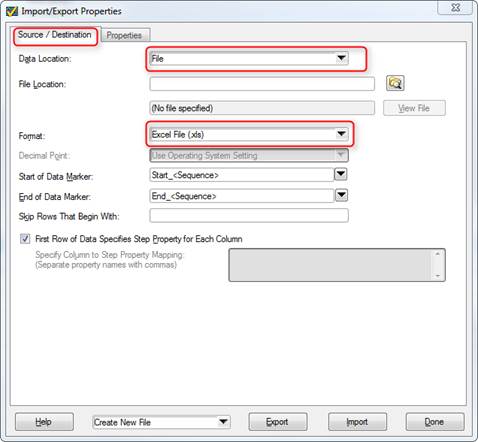 Figure 12. Set the file type to Excel for the Property Export operation. 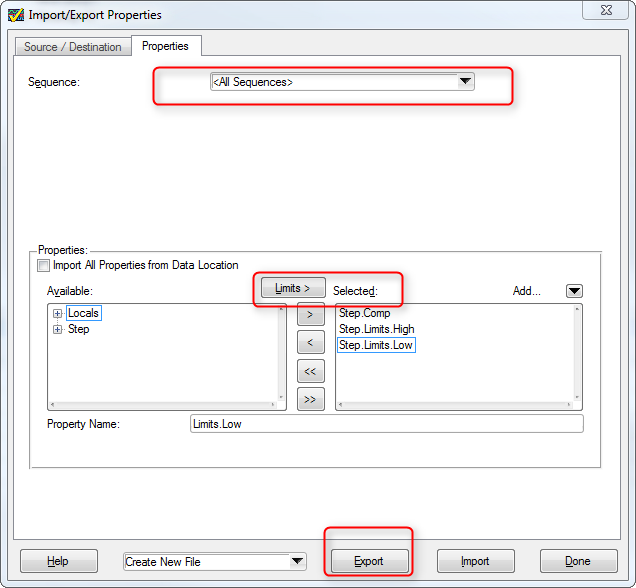 Figure 13. Selecting limits as properties to be exported to an external property loader file. Now let’s take a look at the file that was created in Figure 14. You can see that the limits we previously setup are in there along with empty fields for locals, file globals, and station globals.  Figure 14. Excel file result of the property loader export function. Going back to the main sequence, click on the Property Loader step we added and click Edit Property Loader… in the step settings. Make the settings shown in Figure 15 for the Properties tab and shown in Figure 16 for the Source tab (navigate to your property file you created as your file path will be different).  Figure 15. Property loader step type settings.  Figure 16. Property loader step settings for data source. Next thing I added, that is optional, is a message popup to the AmplitudeAndFrequencyTest sequence to show the limits that were read from the limits file. Figure 17 shows the expression needed to create this popup message. This is just to illustrate that the limits are being pulled from the file at this point and not what is saved in the sequence file. We don’t have to do anything to the sequence file to get the limits applied to the test results, that’s all handled in the property loader. One thing we may want to do is simply zero out the limits in the sequence file so no one is tricked that the limits are stored there. This may call for a Label comment as well. The bad thing about zeroing the limits is now when you read the sequence file the descriptions would just list limits of zero. So, it’s up to you what you like.  Figure 17. Expression that reads back the frequency limits as loaded with the property loader file. SummaryThat’s all I’m going to go over in this post. I worked through adding a sub-sequence with a parameter, a message popup and wrote some statements to validate the input. I also showed the basics of using the Property Loader to load limits and other values from an external file. Source CodeFind the code for this post here Related
0 Comments
Your comment will be posted after it is approved.
Leave a Reply. |
Archives
December 2022
Categories
All

|
 RSS Feed