|
A while back, actually quite a while back, I decided to start adding some test engineering related projects to this site. The first one I took on was developing a test executive from scratch in Labview. I realize that NI has the TestStand product that is an off-the-shelf test executive. I have not used TestStand in years simply because my company does not currently use it. I’m sure what I’ve developed is no match for TestStand, but there is room for developing your own test executive. Some reasons may be you don’t want to pay for TestStand (although it will cost you time and effort to develop your own). Perhaps TestStand is overkill or maybe it will not meet your needs. Basically, developing a simple test executive was a good test related project that would require fairly extensive user interface development. I’ve given my test executive a name, the DOT-TE or Dana On Test Test Executive. That seems a little more cute and clever than I like to be, but it gives me something to name the VIs. I’ve spent quite a while working on this as I have been working on it in my spare time. Like most engineers, I didn’t think it would take as long as it has. This project is still pretty far from being a stable test executive that could be used in a manufacturing environment. In fact I think it’s at about version 0.1. If you look at the specifications and code there are some features that I have not yet implemented, I could keep working on it before making this post but I just feel like it’s time to ship (so to speak). Prototype The way I decided to tackle this problem was to first create a prototype of the user interface with stubs of the main functions I wanted it to have. I saved the prototype that was created; it’s posted in Projects and Code page in the DOT-TE.zip file as “DOT-TE_Main_UI - Prototype.vi”. The point of the prototype was to get an idea of the look and feel of the user interface and help think of all the functions a test executive would need. The main user interface is based on the Producer Consumer design pattern that comes with Labview. Each button click or menu click puts a message into a queue (producer) and sends the message to execute some related code (consumer). Project Planning After I had the prototype the way I wanted it, I tried to write some specifications. I suppose writing specifications wasn’t all the necessary for a project the only involved one person, but I wanted to make this somewhat a true-to-life project. Here are the original specifications I wrote after I had the prototype. Looking at this, I’ve implemented less than half of this: Specifications log in with different privilege test modes sequence file reports print a report database access db limits db store results db sequence file looping subset testing display status and messages display tests p/f input test information PN SN MN Comment load test button run test button edit sequence edit limits directory storage control setup controls like printing display system messages App Database will hold: Test sequence Limits System Database will hold: Test results/reports Put error messages to the System Messages Obviously, the specifications were nothing elaborate. I just wanted to try to make myself think of all the features it should have. In addition to the specifications, I wrote a program flow to try to map out how the test executive would be used and how it should behave. This expands on the specifications and was a way for me to think and write some notes. I have not edited this from what I originally wrote. Test Starts Internal: - Initialize the menu system - Initialize System Messages - Initialize Test Status, Detailed Results and Test Reports to be blank. - Check for the application database External: - gray out Load Parts, Run Test, Abort Test - System Messages - “System Initialize…” - “System Idle.” Load Test External: - select a test from file dialog - populate the tabs - Test Status Tab - list tests - Detailed Results - list tests - list measurements - System Messages “Test Application X Loading…” “Test Application X Loaded Successfully” - enable Load Parts button - System Messages “System Idle” Internal: Load Test button has been pressed. Go to case “BUTTON – Load Test” Go to the default or current test application directory and display the directories available to load. Display the system message “Test Application X Loading…” Check for a valid test application database Check for a valid sequence file and limits file from the application database Read the limits file from the database and hold it in memory somehow. Read the sequence file from the database and hold in memory somehow. Make visible Test Status, Detailed Results and Test Reports listbox, table, whatever with the tests listed. Test Status - lists the tests - add a test loaded Boolean - add pass fail text and Boolean Detailed Results - list the tests - list all the results by reading from the limits file Load Parts External: - put cursor on the “site” field of Test Information - gray out “Complete” button - once “Complete” is pressed enable “Run Test” button - System Messages “Loading Parts…” “System Idle” Internal: - Put the Test Information into a global - When all required Test Information is entered, enable the Complete button - Enable Run Test button and turn on the Test Loaded Boolean when the Complete button is pressed. Run Test External: - update Test Status after each test with p/f - update Detailed Results after each test with measured values and p/f - update Test Reports tab with report when done - generate overall result on front - System Messages “Test Running…” “Running Test X” “Testing Complete” “Report upload to database: Success/Failure” “System Idle” - while running gray the Exit button Internal: - call each test vi according to the sequence file and execute - determine the result of each test - determine overall result - generate test report - check if printing Unload Test External: - clear Test Status tab - clear Detailed Results tab - System Messages “Unloading Test…” “System Idle” - gray - Load Parts - Run Test - Abort Test Internal: Abort External: - stop testing when current test ends - System Messages “Aborting Testing…” “System Idle” Internal: - read from sequence to determine next test Menus - disable menus while test is running. Other Functions (Options) Print Setup (default off) External: - print on completion - print on fail - print all results summary only - print failing results only Internal: Looping (default off) External: - stop on fail - number of times to loop - System Messages “Looping Enabled” Loop stats while looping Test Subset External: - display all tests for loaded test or display no test loaded - radio button for test to run - select all button Application Directory External: - browse to where you want to load test apps from Tools Test Sequence External: - set the names of the test to run (add, remove test) - set test execution dependencies - select the limits file to use with the test application - select the test application name Limits File Fields: App Number App Name Test name Test ID Limits Part Model Serial Units Database – DOT-TE (maybe just make this a folder where the test reports go in the first version) Holds: Test Reports Database – DOT-Test_App Holds: Table 1 – test sequence Table 2 – limits file Looking back, I didn’t do a lot of this, but I feel like it was worthwhile as part of the process. Operation The project was implemented in Labview 8.5 (I know, I’m several versions behind, but that’s what I have access to at the moment). If you go to the Project and Code page of the website and download the code, everything is included in the DOT-TE.zip file. Within the DOT-TE.zip file the project is controlled by the Labview project file DOT-TE.lvproj. The folder “DOT-TE” can go anywhere, I’ve been putting it right under C:\. The test executive code is in the folder DOT-TE Application. The test application is in the Apps folder. The test application is like the actual test code that would be written to test a DUT. The test application is run on the DOT test executive. The example test application I wrote called DOT-Test_App_00001 includes five test VIs that would test some commonly grouped functionality of the DUT. The five tests output constant values in place of real measurements. There is also some code in the five tests to hook into the test executive and make the measurements accessible to it. Opening DOT-TE_Main_UI.vi it executes automatically to start the UI. The idea of the interface is to follow the buttons on the left hand side, working your way down starting with “Load Test.” Figure 1 shows the UI with all buttons other than “Load Test” and “Exit” disabled. This is the default state. 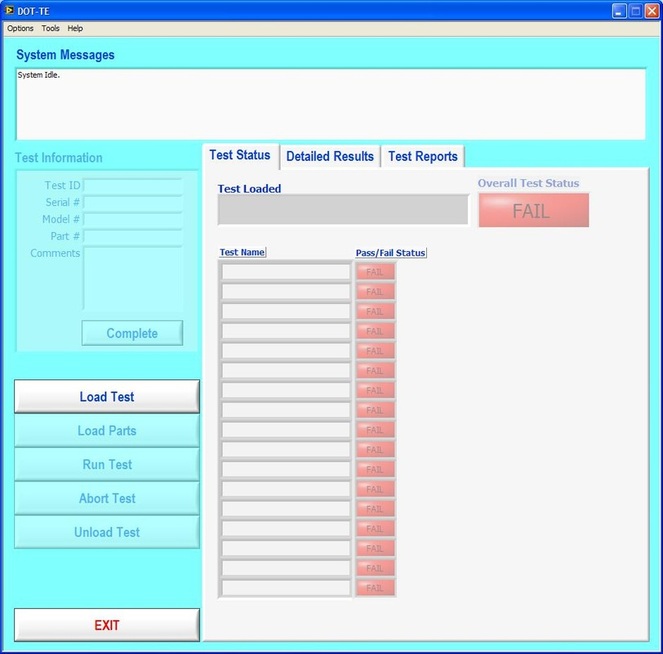 Figure 1. Default view DOT-TE user interface. At the Load Test file dialog select the test application file “Test_App_00001.txt” in Apps\DOT-Test_App_00001, this will load the test application. Figure 2 shows the “Test_App_00001.txt” file dialog. 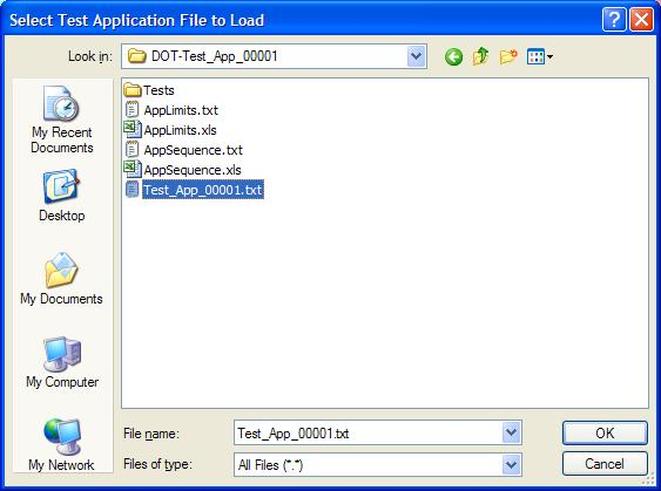 Figure 2. Selection of the application file when “Load Test” is pressed. Pressing “Load Parts” will make the Test ID field of the Test Information active. The test information is how you would identify an instance of the DUT you are testing. The test ID will accept any free text as will the serial number fields. The idea of the Test ID is you would have some system of how to identify a particular test run and enter this there. The serial number would be the serial number of the specific DUT you are testing. Entering the Model # and Part # fields will popup dialog boxes allowing the user to select from the model and part numbers that are listed in the limits file. The purpose of the model and part numbers are just more information to identify your DUT. This is useful, for example, because different model numbers could indicate slightly different DUT configurations. So, two model numbers may have all the same measurements, but different limits need to be applied to those same measurements. What’s nice is there can be a small change to the DUT and the test application and test executive are able to handle it without creating an entirely new test application. Digressing from the UI for a minute, Figure 3 shows the limits file I have mentioned a few times above. 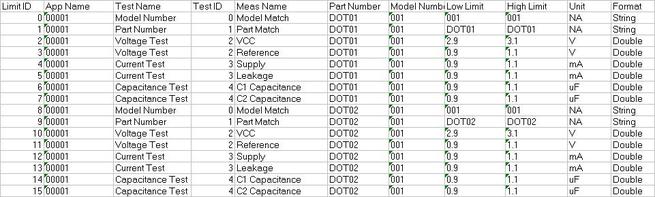 Figure 3. AppLimits.xls limits file The limits file is edited in Excel and saved as a tab delimited text file for the test executive to access. The limits file in Figure 3 has several fields, and five fictional tests. You can see that each line of the limits file is uniquely identified with the “Limit ID” column. This limits file has two instances of the same tests, one for part number DOT01 and another for part number DOT02. I’m not really using the model number as it’s only there to make the possible DUT configurations more flexible. Each test and measurement has a unique name. All the limits are the same for my two part numbers, with the exception of the Model Number test. The app name 00001 comes from the test application name Test_App_00001. The intention is all test application names would take the form Test_App_XXXXX. I guess it’s not that descriptive, maybe that should change. Getting back to the test executive UI and entering the test information. When you tab to the Model # and Part # fields you will see the two dialog boxes in Figure 4 respectively. 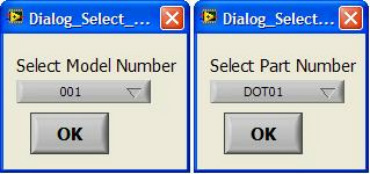 Figure 4. Select Model Number and Select Part Number dialog boxes. Again, the pull down in each of these dialog boxes is populated from the limits file model number and part number columns. Finally, pressing the “Complete” button in the test information section will fill in the information in the “Test Status” and “Detailed Results” tabs of the interface and enable the “Run Test” button. See Figure 5. 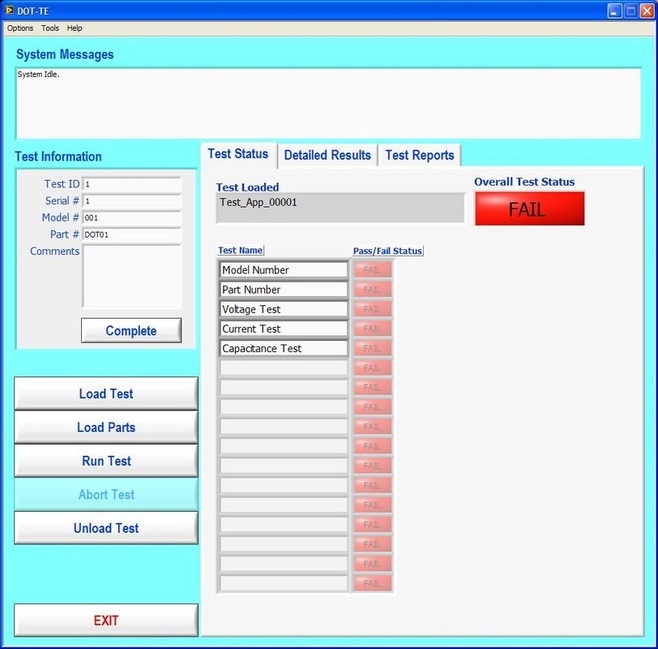 Figure 5. DOT-TE UI with parts loaded and Run Test button enabled. Actually running the test is somewhat anti-climatic because the results are just hard coded for this example test application. Figure 6 shows the directory that holds the test VIs executed when the test is run through the test executive. Again, there a no real measurements happening, but the idea is these VIs would be where you perform the actual measurements on the DUT. You can see in Figure 6 the naming convention I have chosen for the tests. TEST-(test name)-(app number).vi. 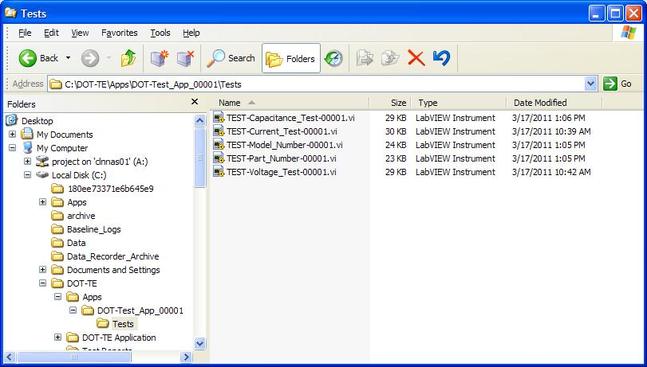 Figure 6. Test application test directory. As a result of running the all the tests, Figure 7 shows the “Test Status” tab with all of the individual tests passing and the overall test status of pass. Figure 8 shows the result of the passing test from the “Detailed Results” tab. The most important information here is the actual measurement data. In the event of a failure, this tab would show you if the test failed high or low relative to the limits or if no meaningful data was gathered (like a test returned NaN). 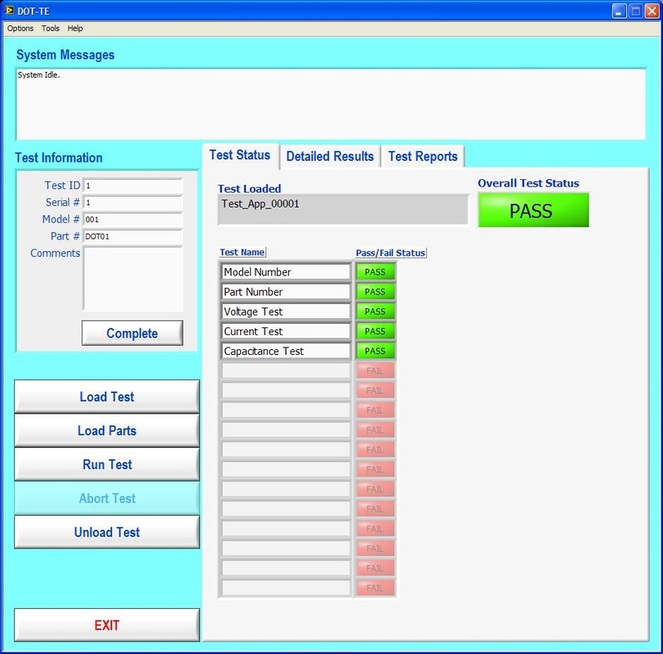 Figure 7. Result of passing test in the Test Status tab view. 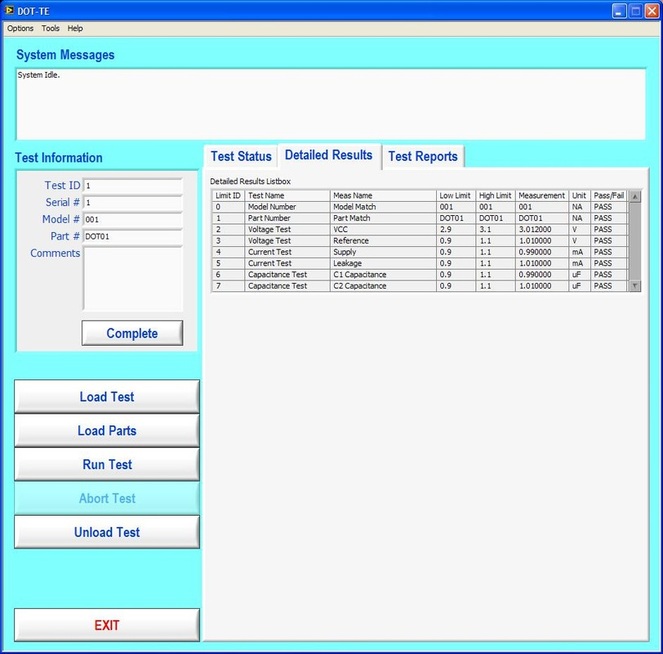 Figure 8. Result of passing test in the Detailed Results tab. At the end of each complete test run an html test report is generated. The test report basically shows the same information that is in the detailed results tab. The history of all the test reports generated since the test executive was opened is in the “Test Reports” tab. Figure 9 shows this. 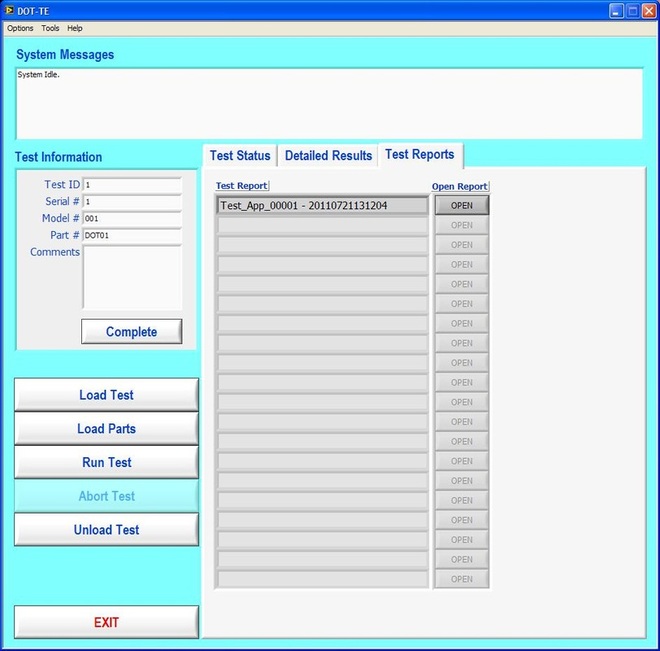 Figure 9. Test Report tab view following passing test. A good enhancement here would be to include the pass/fail status in the test report name. I forgot that. Also, it’s a bit cryptic, but each test report name includes the date and time stamp. At this point, the “Unload Test” button can be pressed and a new test app can be loaded. Or, the “Load Parts” button could be pressed and a new DUT could be loaded and tested. The “EXIT” button unloads the test (if the user forgets to press unload test) and stops the test executive VI running. There are three pull-down menus at the top of the interface: Options, Tools and Help. Options includes sub-menus: Print Setup, Looping, Test Subset and App Directory. Print Setup optionally prints the test report automatically upon test completion. The default is off. Looping is not implemented. Test Subset selects a subset of the tests to run. So, if you have a lot of tests that are very long you can choose to skip some of them. This relies on having an AppSequence file in the test application. Figure 10 shows what is in the AppSequence file. 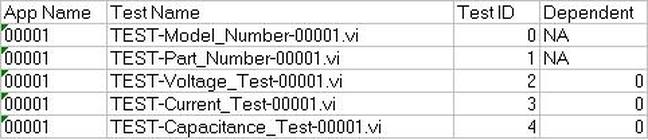 Figure 10 AppSequence file. The AppSequence file also allows dictating test dependency. For example, in Figure 10 if the user tries to run only the test TEST-Voltage_Test-00001.vi without running TEST-Model_Number-00001.vi (where 0 listed in the Dependent column is the Test ID of TEST-Model_Number-00001.vi) an error will be generated from the test executive. The App Directory changes the default location the test executive looks when loading a test application. All options in the Tools and Help menus are not implemented. Implementation I won’t try to go over every detail of the code, if you are familiar with Labview I think it’s pretty simple. Figure 11 shows the project explorer file DOT-TE.lvproj. The project is implemented in one main VI (DOT-TE_Main_UI.vi) with four directories contained all the sub-VIs (Dialog, Globals, Main Functions, Utilities). 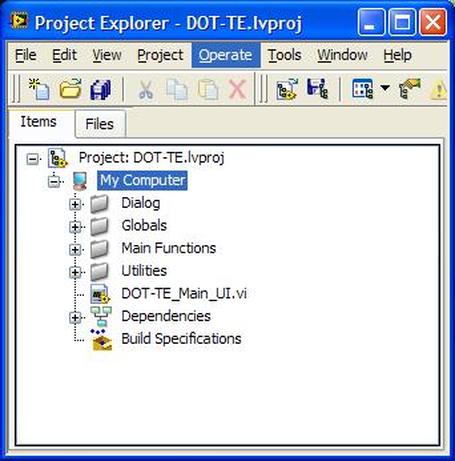 Figure 11. DOT-TE Project Explorer. Figure 12 shows the block diagram of DOT-TE_Main_UI.vi. It may be a little hard to see here, but this is just to see the general producer consumer style. The upper portion contains the event structure that sends a message to the consumer with every button or menu click. The messages are sent with a queue. 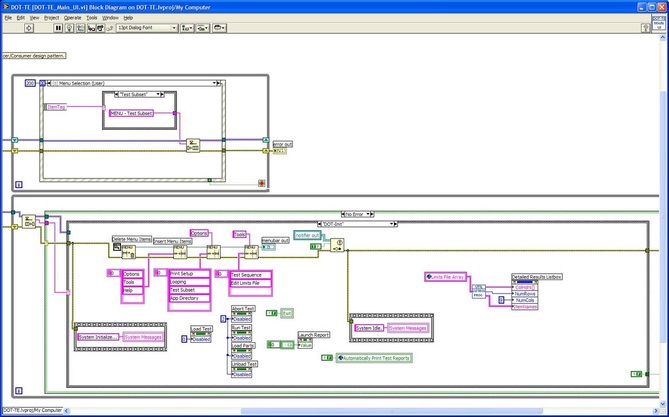 Figure 12. DOT-TE_Main_UI.vi block diagram.
Future Work There is a lot that should happen to this code before it could be really useable. Right now it mostly just demonstrates the concept. There are several places that could be improved. There is no error handling to speak of. The System Messages on the front panel were not implemented. The system messages should be telling the user what’s going on, like when the test is running or the system is waiting on something. Some of the menu features are not implemented. There is very little documentation of the code. Summary A test executive is an important piece of software for a test organization to have in support of manufacturing. While off the shelf test executives exist, there may be cases where a custom design would be worthwhile. The DOT-TE test executive presented here is really about half way done, but it illustrates some important features for a test executive to have as well as some user interface coding concepts in Labview.
5 Comments
|
Archives
December 2022
Categories
All

|
 RSS Feed