|
When talking about debugging people might think of debugging code, and while that is part of it, I’m referring to the larger problem of solving test issues no matter where they are found. Perhaps trouble-shooting is the correct term, but either way every test engineer has to do it and it can be a difficult skill to learn and perform effectively. Debugging mostly comes down to being able to think logically, but it’s not just something you are born with you have to learn (and usually the hard way) by doing it over and over until it becomes natural. I don’t think debugging is something that normal people (normal people are non-engineers) are very good at and a lot of engineers are not even all that good at it. It’s not really their fault; they just haven’t had enough practice. Despite all this, there are some tips to keep in mind while debugging, these are the type of tips that are easy to know but not always easy to follow. There are two main situations where a test engineer has to debug something. - Debugging problems that occur during test hardware and software development - Debugging unexpected problems that occur during manufacturing after you think you are done. These are more serious problems and often much more difficult to solve. Below these two categories there is another division of either a constant or intermittent problem. From there, most of the debugging techniques used are the same. The constant type is much easier to solve than the intermittent type. Intermittent test problem I’ll start with the more difficult type of debugging task, trying to find an intermittent test problem. These problems are usually revealed due to the increased volume when a test is initially being run in manufacturing. When faced with an intermittent failure like this, the first thing I usually do is look at the test report and try to see if it’s telling me anything. Is the problem that the test fails a limit or is there some software error being generated? If it is a limit failure that might just be a bad part and the part might need to be retested or otherwise analyzed. If it’s a software error, I’ll think about the error in the context it occurred and see if there is some reason for it. Like is an instrument giving an error because it’s trying to measure out of range. So, if you eliminate these obvious things and the DUT seems good, you have a true intermittent failure. It may fail every other time or 1 in 1000 times, either way it’s time to get in the lab and debug the problem. Recreate the problem Before you can fix the problem you have to understand it and to do that you have to be able to recreate it. It is sort-of Murphy’s law that these things be difficult to recreate, but you can’t really be sure the problem is fixed until you can cause it to happen and then apply your fix to prove the problem is gone. It’s quite possible that recreating the problem will be the bulk of the work because you will end up understanding what it going on if you can recreate it. When trying to recreate a problem you often fall into the following pattern. - Looping the test - Look for patterns in the looping data - Change something - Loop again Looping the test means to setup the test to run over and over on the same DUT and test system setup until it fails. You probably won’t learn anything just by looping until the failure happens again. You take measures to gather more information in the event of a failure. For example, maybe you suspect a noise signal causing a problem so you set up a scope to trigger on a spike and see if is the scope shows anything upon failure. Or, you modify the code to stop on a breakpoint when the failure occurs and hopefully the DUT is left in a state where the problem can be repeated. These are the ways you gather clues to see what was different about the test run on the times it failed. When you change something you are hopefully affecting the failure rate, with the goal of making it fail every time. This might seem strange, because you might think that change the test so that it fails is just breaking it. What you are doing it trying to exacerbate a situation to make the intermittent failure occur all the time or at least more often. If you can make it fail more often you know you are maybe on the right track. An example might be that in a test you provide power to a DUT and program a delay into the code to allow the DUT time to reach steady state. Maybe this delay is just on the borderline, so that when you were developing the code you never saw the problem but really 1 out of 100 times it is a problem. So, you can make the problem worse by shortening the delay and seeing if the failure occurs more often in the looping. Change one thing at a time This is important, when you change something, just change one thing at a time. This is a hard rule to follow, especially if you have to loop in-between because you have to be so patient. Also, if you change something and it doesn’t have an effect, change it back before you change something else and try again. If you don’t do this you can get lost very fast, because now you don’t know if the latest change or the combination of the latest change and some previous change is making the difference. Take small steps In addition to only changing one thing at a time, change things in small steps if possible. Let’s say that you are looking for a glitch on a signal by monitoring it with an oscilloscope. Say you are changing some parameter of a test like a delay or a voltage. You might think to try a low voltage and a high voltage and this does not appear to have an effect, but really you have missed some behavior that is a clue by jumping the voltage too fast. Take small steps. Ask for ideas If you have a collogue who will listen, it helps to run through the problem and all the things you have tried with them for some ideas. They may know something about the system you don’t or might have some ideas that didn’t occur to you. However, you have to know who you are asking, that they have the skills to help and that they will be willing to help without trying to take over. Think about the assumptions Think about the assumptions you are making. Do you really understand everything you think you do? Are you assuming that the problem is not related to a certain piece without having proved it? Write everything down Keep track of what you have tried, it sounds silly but you can go crazy pretty fast on a tough problem and just start spinning your wheels. Look back at what you have done and this will help you to think logically and see patterns. Nothing works It is quite possible that you will not be able to make the problem worse and make the problem repeatable. All the debugging techniques like only changing one thing at a time and taking small steps still apply. However, you are stuck in the change, loop, wait cycle which is much slower. Really if you are able to recreate the problem, you are most likely 90 percent of the way to solving it. Isolate the problem Once you can reliably recreate a problem or you have a repeatable problem to begin with, you can start using a logical process of elimination. Is the problem in hardware or software? Is it the DUT or the test system? You have to start crossing things off the list and narrow it down. It is much easier to debug if you have multiple instances of all your hardware, that way you can swap them in and out to hopefully isolate a problem. Here is an example of the process of elimination. A test system is a complex system. A problem can be in the DUT, the tester the ITA, the fixture or the software. It’s just a flow chart. See Figure 1. 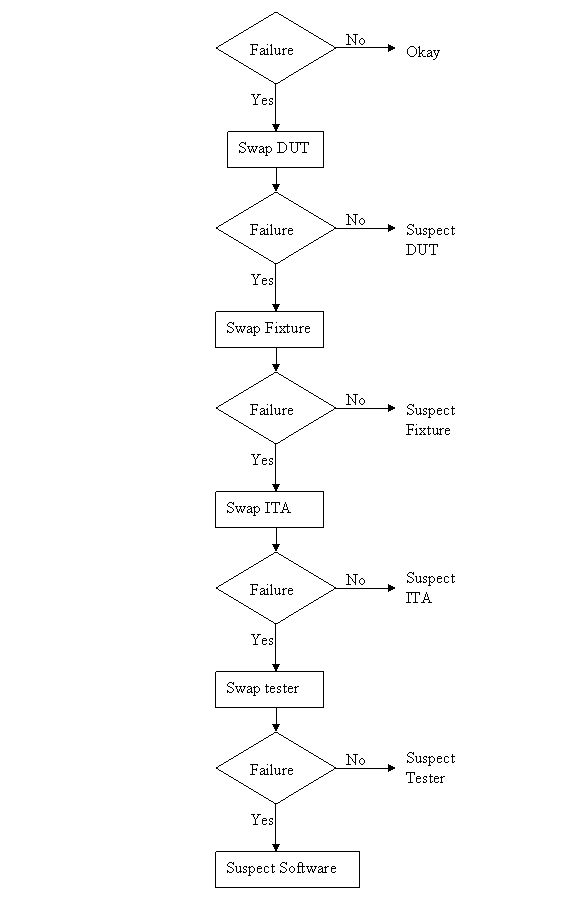 Figure 1. Isolating a problem among test system components. Recreate the experiment Once you think you have recreated the failure or found a pattern where if you make a certain change it has a certain effect, then try it all again. That is, turn everything off or take apart the setup and try to recreate the whole thing. Make sure your experiment is repeatable. I’ve had it happen many times where I thought I had a pattern only to have it go away when I start again. This is the type of thing that happens if you make more than one change at once and forget about the changes you have made. Prove it another way Try to prove everything two ways. So, when you think you have a pattern figured out try to think of another way to prove it that is independent. Maybe you found some noise on a digitized waveform, try to see the noise on an oscilloscope to make sure it’s real. You will ultimately have to convince someone you have found and solved the problem, this second proof will strengthen you case. Example I recently had an opportunity to do a simple debugging task at home. Granted, this is very simple, but it somewhat illustrates the debugging process. I have an old DirecTV DVR receiver that was often having the signal on Input 2 break-up. (a DVR has two coax inputs so you can record two shows at once) Figure 2 illustrates the setup. 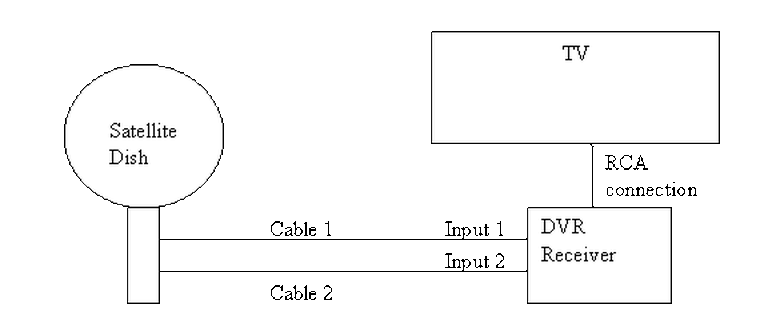 Figure 2. Satellite TV with DVR setup
The first thing to do is to make sure you know what problem you are trying to solve. In this case, the problem is that picture on Input 2 is goes out and breaks up intermittently. Next, I had to think of all the things that could be wrong and start eliminating them. So, the Satellite dish on the roof might have a problem, Cable 2 might be bad. The input or tuner on the DVR might be bad. I’m hoping that the result is the DVR is bad because it’s over five years old and ready to replace anyway. This is my main suspicion because as crazy as it may sound I’m sure five years is a remarkable amount of time for a piece of consumer electronics to last. Also, it seems logical as this is by far the most complex piece of the system. Having thought it through this far, the objective is now to prove that if I replace the receiver that it will work and that will fix the problem. The first thing I tried was to check the signal strengths of the two inputs using the DVRs menu. It said 95% on input 1 and 87% on input 2. Hmm… that doesn’t tell me that much. While this doesn’t rule out the DVR it probably means the dish and cables are fine. It is interesting that input 2 is a little bit lower, that might be just a random result. At this point I had a much better idea, if I switch the two cables going to the DVR and the problem stays on input 2, then the DVR is the problem. If I switch them and the problem follows to input 1 then the cables or dish are the problem. Well, after switching them the picture on input 2 was still breaking up confirming my suspicion of the DVR input 2 being bad. I have since replaced that DVR with a new one and it is working great. Of course I never really got to the root cause of the problem with the DVR, but in this case I don’t really care and it may not be possible to find that without more information about the DVR itself anyway. Summary Debugging is a difficult task because this is how you tackle the most difficult problems. There are some concrete techniques to keep in mind when debugging. The keys to debugging are being patient and methodical. Write down what you have tried and try to think as logically as you can. It’s interesting that often times you will amass all these clues that seem to mean things or are patterns and some of them seem to contradict each other. When you finally figure out the root cause and really understand what’s going on, everything makes sense. You find yourself seeing the light and all the pieces fit. That’s a good feeling. |
Archives
December 2022
Categories
All

|
 RSS Feed